How to organize and backup photos from multiple folders in Windows
I came across a rather common data management problem recently, that I believe a lot of people struggle with.
The problem setup is something like this:
- Huge collection of personal files or photos (jpg, png, PSD, raw, and others), distributed between multiple computers, USB-disc drives, and yes, even across multiple cloud providers. When I say huge, I mean 20 years or more of collecting digital photos. Hundred thousand files or more, located in hundreds or thousands of folders.
- Some back-ups exist, but they are not in sync or have low fidelity.
- Google Drive is not able to index due to the total complexity.
- Tens of GB wasted in duplicates. In many cases, same image content but a different file name and or location. Example: Image3124_version1.jpg, Image3124_version2_but_with_hedgehog.jpg, Image3124_version81_still_with_hedgehog.jpg… You get it.
- Extended use of temp folders in the heat of the moment.
- Little to no naming convention on folders.
- Local hard drives starting to complain about low disc space (and are about to go bust any day)
The goal and priorities after the cleanup
- Stop worrying about data integrity.
- To have a common simple setup that is easy and understandable to access and read.
- To stop accumulating duplicate files and folders, and hence be dependent on increasingly larger and larger USB backup devices.
- Leave versions of older files only on the cloud storage (and USB-physically), and NOT sync 100% of the files locally. I think it’s mind-boggling that this is still an issue regardless of the chosen operating system. iCloud has solved this elegantly on the iPhone using Photos, but for regular files on a Mac or Windows device, it’s still the sync-all methodology that is widely used. That doesn’t do shit for my low disc space problems! I’m sure you can relate if you’ve read this far.
- Save money (Cloud storage, USB drives, time?)
- Better sleep. This is what we all want, isn’t it? Let’s go!
The solution
I had almost given up on finding free Windows software on the internet that is not a scam. In this case, however, I found two gems. They deserve all the praise. You’ll also need a master USB drive to initiate the heavy lifting. If it’s mainly photos in JPG, a 1TB will normally get you a long way. Please also have a cloud sync solution up and running. We go with Google Drive in this case.
Caution: Before you start this cleaning session, make sure any sync applications like “Backup and Sync from Google”, “OneDrive sync” or other alternatives are closed and currently not pushing updates. We’ll switch these back on later when the folders are clean and ready.
1. Identify the currently largest copy of the specific folder you would like to clean up
This is normally the main photos folder on the computer you use the most. In my case, it was the Photos folder existing inside the Google Drive folder. On the first computer in my case, it was holding ~140GB of photos.
2. Start building the “super” folder
Copy a version of the folder from step 1 into the USB drive where there is a lot of free space. It will be the reference location where you will dump all the content you’ve got. To do this copying, we’ll use the free tool FreeFileSyncTool. I am not sure if it’s faster than the native Windows copying tools, but it sure gives you much more control and better statistics of the entire operation.

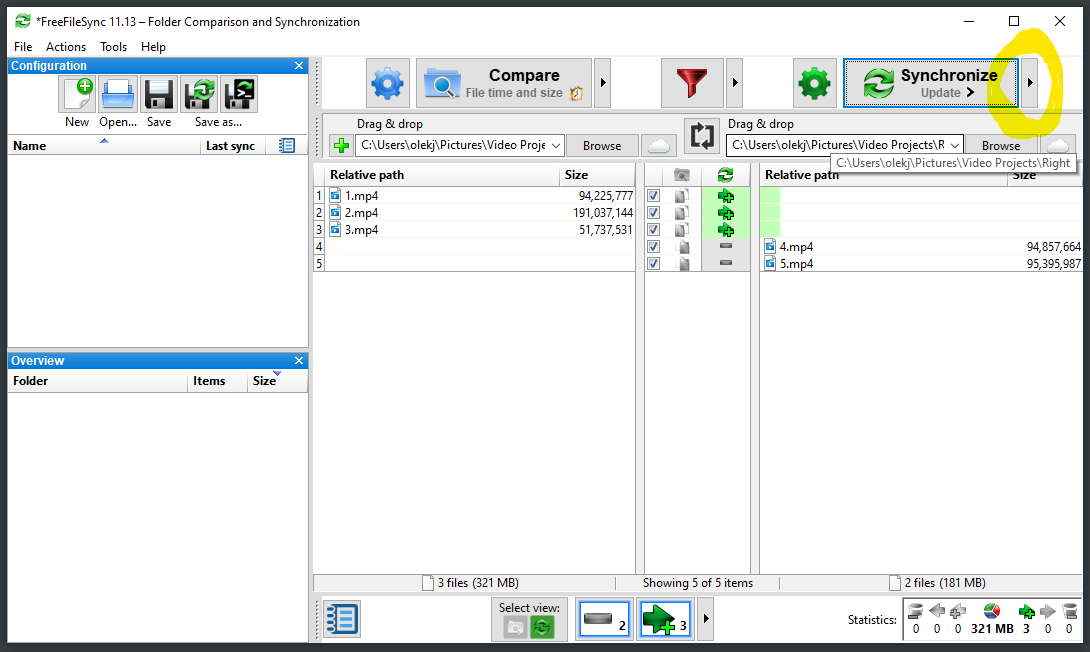
The FreeFileSyncTool interface is split into two panes, one folder on the left side and one folder on the right. In the right section, you’ll drop the super folder. This means data will be flowing from the folders you mount in the left section, and into the right section. Just remember to select the method “Update” in the upper right corner of the application. Be careful that you don’t use the “Mirror” option, this might delete data on one of the sides. Your view should look something like this:


Notice that in my case here on the screenshot, 3 files will be added to my super folder called “Right”.
Repeat this process with all your image folders, to make sure the ‘super’ is as fat as it can be. It should contain all you’ve got, soup to nuts.
3. Clean out duplicates
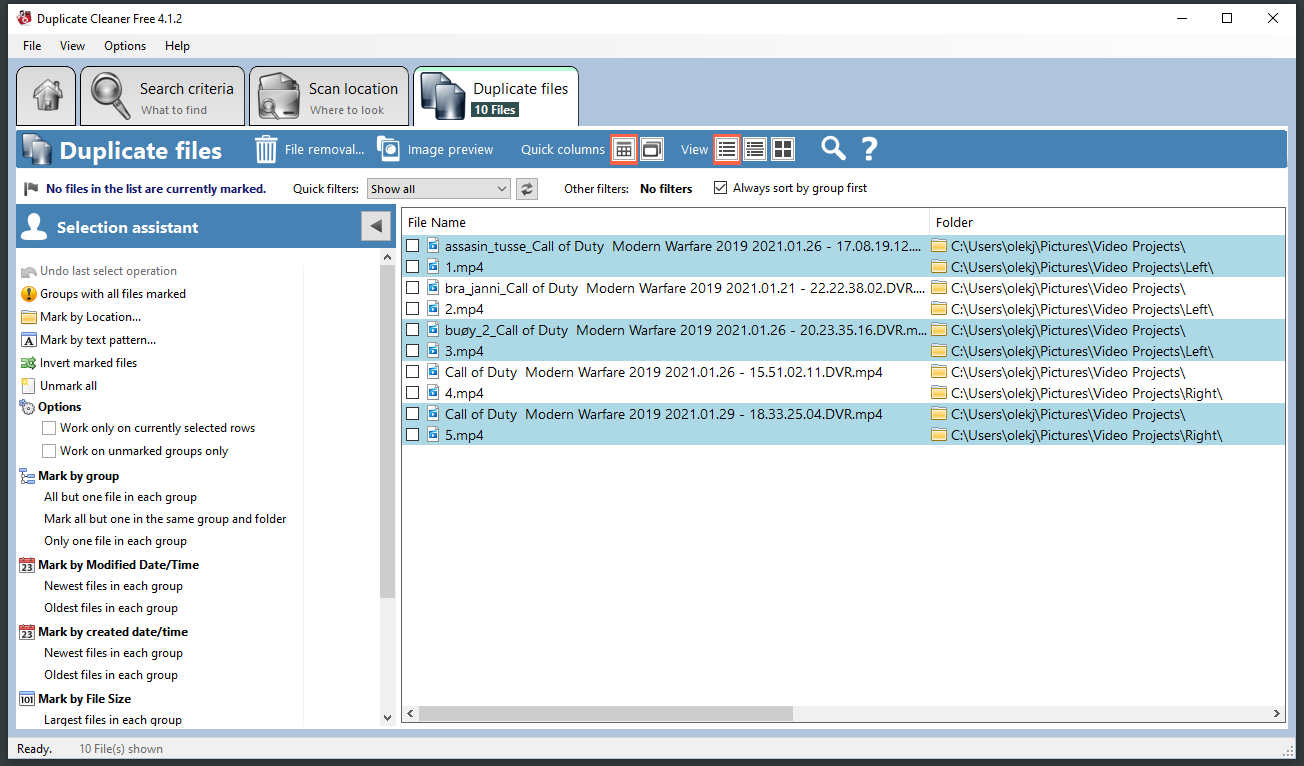
It’s time to clean out the duplicates, and there is an app that does that for you smoothly. It’s called Duplicate Cleaner Free, and you’ll find a free version of it in the Microsoft Store in Windows. This is the first time I’ve found something useful in there, so I guess the world is improving.

Simply select the ‘super’ folder on the USB drive and click “Scan for duplicates”. This application sort duplicates into groups, and you should now use one of their predefined filters to select all except one file in a duplicate group. This way, you’ll make sure you will keep at least one version. Click “Clean” and wait for the app to do its magic.
4. Introduce new naming convention and group folders by year
Before we push to the cloud, let us introduce a new way of grouping our folders into years. We’ll do this manually, but it will save you lots of work later. It will also make it easier to select which part of your folders you would like to keep locally on your computers, and which to keep as cloud-only storage. To me, it makes sense to keep the local and cloud copy of the newest and most recent years. I simply create a new folder for each year and then introduce subfolder naming like this
- 2020
- 2020-05-00 - Various pictures from May
- XX (Folder, containing edited pictures)
- img_001.jpg
- img_002.jpg
- 2020-05-00 - Various pictures from May
- 2020-05-17 - Celebrate Norwegian Independence Day
- 2020-05-20 - Trip to the Zoo
4. The super is ready to be pushed to the cloud
Since the ‘super’ just went on a diet and has not got a new folder structure, you should be able to swap it with the current ones you have on all your computers. In my case, I’ll replace the “My images” folder in my Google Drive with the new ‘super’.
I’ll write another post on how to deal with Google Drive and syncing only specific folders.
Cheers!